Creating Scheduled Dashboard/Reports in Talkdesk
Creating Schedules
Explore allows you to distribute reports and dashboards regularly. You can also download or send reports on demand for any desired date range over the previous 12 months.
To use this functionality you must have permission to schedule reports and dashboards. For more information, please check the article Explore Overview.
Note: If you are the one who created a schedule, you will be the only user who can access the settings of that schedule. Conversely, you will not be able to configure the schedules that your colleagues set up.
Scheduling Dashboards:

- Navigate and click on the Explore icon on the left side menu.
- Open Explore.
- Select the dashboard you want to schedule. For this example, we’ll use Calls.

Once in Calls you can click on the three-dot icon at the top right and navigate to Schedule delivery.


Next, you’ll configure the schedule’s parameters:
- Name your schedule.
- Set the delivery schedule
- Add the recipient's list.
- Pick the file format.
- Click Send Test to preview the scheduled dashboard or report. Talkdesk will send the test to the addresses in the recipient's list within minutes.
- Click save to store changes.

You can adjust the Filters for this schedule according to your needs. By default, the schedule adopts the filters you last saved on the dashboard.
Once all settings are configured according to your preferences, click Save to finalize the scheduled dashboard.
Advanced Options
Scheduled dashboards support the following advanced options.

SETTING |
DESCRIPTION |
| Format options: Arrnage dashboard tiles in a single column | Use a single-column layout. When checked, dashboard tiles will be ordered vertically. When unchecked, the tiles’ position will match their orientation on Talkdesk. Expand Tables. When checked, tiles containing tables will be expanded to show their full contents. When unchecked, tiles will be compressed. |
| Delivery Timezone | Allows you to define the timezone the dashboard tiles run their queries. The default value is the timezone set at the account level. This time is distinct from dashboard-level settings found under “Deliver this schedule”. |
| Paper Size | Only available when “Format data as” is set to PDF. Allows you to select from a set of standard paper dimensions for printing. |
Scheduling Reports
By scheduling reports from Explore, you can analyze data in ways that best suit your needs.
Creating a scheduled report mirrors the process for scheduling dashboards. However, there are additional features in Format data as and Advanced options (more details below).
To create a schedule for a report, please follow the steps below.
Note: Depending on the type of report, Talkdesk displays the last 7 days of information or up to 500 rows in its preview.

- Navigate to Explore
- Open the report you want to schedule
- For this example, we’ll use the Agents Report.

- Click the gear icon > Schedule.

Next, you can customize the schedule:
- Name your schedule in the "Give your schedule a name" box.
- Add the recipient's list under email.
- Set the delivery schedule under "deliver this schedule".
- Click Send Test to preview an iteration of the scheduled report. Talkdesk will send the test to the addresses in the recipient's list within minutes.
You can adjust the Filters for this schedule according to your needs. By default, the schedule adopts the filters you last saved on the report.
Once all settings are configured according to your preferences, click Save All at the bottom right to finalize the scheduled report.
Advanced Options
Scheduled reports support the following advanced options:
SETTING |
DESCRIPTION |
| Send this schedule if | Allows you to send the report only if it contains matching results, only if there are no results, or always. |
| Limit | Results in Table. Sends only the results in the preview, up to 500 rows. This setting is non-configurable once the scheduled report is saved, and duplicated reports will preserve this setting. If your needs require you to change this setting, you must create a new report with “All Results” selected.All Results. Sends all results matching the report’s parameters. This is the recommended setting for creating a new Scheduled report. Note: “All Results” is not available for these reports: Activity Report, Inbound Dispositions, Outbound Dispositions. |
| Format options | Apply visualization options. Ensures visualization options used in the portal are preserved or ignored when shared.
Formatted data values. Defines whether column headers include or exclude data section labels.
|
| Timezone | Allows you to define the timezone the report’s query is run. The default value is the timezone set at the account level. This is distinct from the report-level time settings found under “Filters” and “Deliver this schedule”. |
Duplicating Scheduled Reports
Talkdesk allows you to duplicate schedules for a report using the same method described above for dashboards.
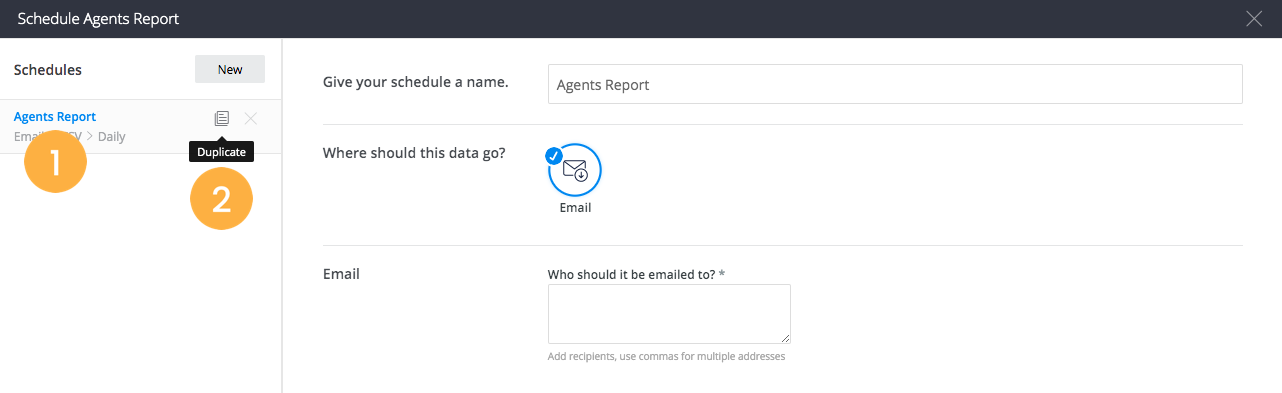
- Locate the Schedule [1] you want to duplicate.
- Click the Duplicateicon [2].
- Select the new schedule and configure it according to your preferences.
- Click Save All to finalize your changes.
Viewing Scheduled Reports and Dashboards

For faster access to your scheduled reports and dashboards, simply enable the Scheduled only toggle from Explore’s landing page.